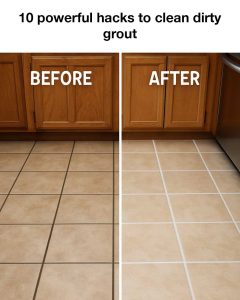
Grout, the material that fills the spaces between tiles, often gets overlooked—until it becomes discolored or grimy. Its porous composition makes it an easy target for dirt, spills, mold, and mildew, especially in moist environments like bathrooms and kitchens. Unfortunately, cleaning grout isn’t as simple as wiping down a countertop. Its rough texture and narrow lines trap grime, which can make cleaning a tedious chore without the proper techniques and tools. Still, keeping grout clean is crucial—not just for aesthetics but also for the health of your home and the lifespan of your tiled surfaces.

Dirty grout can make even a spotless room look uncared for. Worse, it can harbor bacteria and mold, affecting your indoor air quality and potentially triggering allergies or respiratory issues. Over time, if grime is allowed to build up, it can degrade the grout itself, leading to loose or cracked tiles. This means more than just a dirty look—it could eventually lead to costly repairs. That’s why it’s worth investing a little time and effort into grout maintenance, and fortunately, you don’t have to rely on expensive professional cleaning services. With the right hacks and a bit of elbow grease, you can restore your grout to like-new condition and keep it that way.
One of the most popular and budget-friendly methods involves a baking soda and vinegar paste. It’s a classic combo for a reason. Simply mix baking soda with enough water to form a thick paste and spread it along the grout lines. Then, spray or pour white vinegar over the paste. The chemical reaction between the two causes fizzing, which helps lift dirt and grime from the surface. After a few minutes, scrub the area with a firm brush and rinse with water. It’s an effective natural solution that avoids harsh chemicals.
Another effective mix is hydrogen peroxide and baking soda. This paste is particularly good for whitening grout and removing tough, set-in stains. Blend equal parts of both to make a paste, apply it to the grout, and let it sit for about 10 minutes. Then scrub and rinse. This method is safe for most grout types and is also great for eliminating mold and mildew.
If you’re looking for something with a fresh scent and gentle abrasiveness, try lemon juice mixed with borax. Lemon has natural bleaching properties and a pleasant citrus aroma, while borax acts as a mild abrasive to help scrub away dirt. Mix the two into a paste, apply it to the grout lines, and let it sit for 10 to 15 minutes before scrubbing and rinsing. You’ll be left with brighter grout and a fresh, clean smell.
For those dealing with larger areas or deep-seated grime, steam cleaning is a powerful chemical-free option. A steam cleaner with a grout-specific nozzle can reach into the pores of the grout and break up stubborn dirt while also killing mold and bacteria. It’s especially helpful in high-traffic or high-moisture areas. Just be sure to use a machine that’s safe for your particular tile and grout to avoid any damage.
When natural methods aren’t cutting it, oxygen bleach can be a game-changer. It’s gentler than chlorine bleach, making it safer for use on colored grout, and it’s still highly effective. Mix the bleach with warm water according to the product instructions, apply it to the grout, and let it soak for 15 to 30 minutes. Scrub well and rinse. This method is excellent for eliminating stubborn stains and restoring grout to its original brightness.
Commercial grout cleaners are also a viable option. These are specially formulated to target specific issues like mold, grease, or soap scum. Many of these products contain powerful agents that break down stains and restore the grout’s original color. If you go this route, make sure to choose a cleaner that’s compatible with your grout and tile materials, and always follow the manufacturer’s instructions to avoid damage.
Sometimes, the simplest tools do the trick. A toothbrush combined with dish soap is a surprisingly effective cleaning combo. The small bristles are perfect for scrubbing between tiles, while dish soap cuts through grease and grime. Apply a bit of soap to the grout, scrub with the toothbrush, and rinse. This method works well for regular upkeep and spot treatments.
For a more advanced tool, consider using a grout-cleaning brush attachment with a power drill. These attachments bring the scrubbing power of a drill to the task, making the process faster and less labor-intensive. Just attach the brush, apply your chosen cleaner to the grout, and let the drill do the hard work. This technique is particularly handy for large tiled areas or heavily soiled grout.
After all your hard work cleaning, it’s smart to seal your grout to protect it. Grout sealers create a barrier that repels moisture, dirt, and stains, making future cleanups much easier. Apply the sealer with a small brush or applicator, following the directions on the product label. Reapply every six months to a year to maintain its effectiveness.
Finally, regular maintenance can go a long way. Vacuum or sweep tiled areas often to prevent debris from settling into grout lines. Clean spills right away before they have a chance to stain, and use a gentle cleaner for weekly wipe-downs. If some areas start to fade or discolor, a grout pen can be a quick and easy fix to restore the original look.
By using these ten practical grout-cleaning hacks, you can tackle even the most stubborn stains and keep your grout looking fresh year-round. Whether you prefer natural ingredients, steam cleaning, or specialized tools, the key is consistency. A little routine care can preserve the appearance of your tiled spaces and save you from bigger issues down the road.


